
Remember that pile of old flour sack towels I showed you a couple of weeks ago during WIPWednesday? They are now a rug and today, you’re going to learn how to make your own!

We started with this large stack of flour sack towels. They’ve been used for about a year and have developed stains and a few holes. Most are still sturdy, just not very pretty anymore.
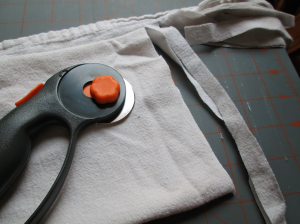
Your flour sack towels will have 2 types of sides – one is a finished fabric edge and one is a seam. Fold the seam sides together so that you have a long rectangle. Fold once more, bringing the fold up to about 1/2 inch below the seam line. Make sure your fabric is nice and flat, no wrinkles. You have two options. You can cut with scissors or you can cut with a rotary cutter. I did the majority of my cuts with the rotary cutter but did a few towels with scissors when I didn’t have space to pull out the mat. When using scissors, it’s easiest to fold the fabric one more time, lining both folded edges together. The fabric would then be 6 layers thick along the folded section, 2 layers thick at the seam edge.
After your fabric is folded and flattened, begin making your cuts. Cut the fabric into 1/2 – 3/4 inch strips, working from the fold towards the seam. Stop when you get to the seam, do not cut all the way through.
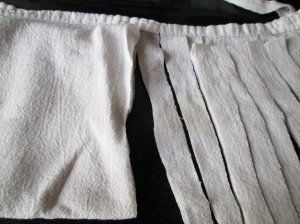
Your fabric should start to look like this. Long strips of cloth all connected at top and bottom along the 2 seam edges. Continue across the entire length of towel.
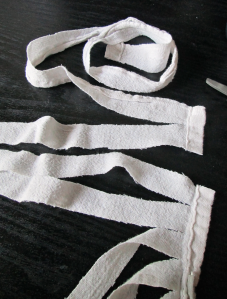
Once you have cut the whole towel into strips that are connected at the seams, shake out your towel and lay it completely flat. Pick one side to start at. At your starting point, cut the seam 1 strip in. On the opposite end of this strip (pull it away from the fabric and you will see where it meets the seam on the opposite end), cut the seam 2 strips in. You should now have a long strip leading back to your first seam end. Cut 2 strips in on this side. Your seam edge should start to look like this.

Continue cutting every other strip at each seam side until you reach the end of the towel. Your final section will have 3 strips connected along the seam. Cut between the last 2 strips. You will now have one long strip of cloth.
At this point, I spun it so that it would be stronger and have a less dense look in the final rug. Leaving the yarn as-is will result in a dense, squishy rug. I prefer to crochet with some twist in the fabric and like the drape I get from spinning the fabric. If you choose to spin it, you need a very large bobbin and a bulky setup.
Begin by cutting off the final seam section. Tie your leader to this end. Begin spinning as you would any other bulky yarn. It doesn’t matter which way you spin it, we won’t be plying it so twist doesn’t matter much.
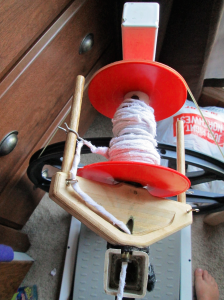
You can see that the yarn pretty much fills the orifice in my Babe Spinning Wheel. I don’t have a bulky flyer on this, but I use my plying bobbin. The seams need some encouragement to go through, but it’s totally doable. I would not be able to spin this on my Ashford. The orifice and hooks are just too small. If you have a bulky flyer, you would have a much easier time of it.

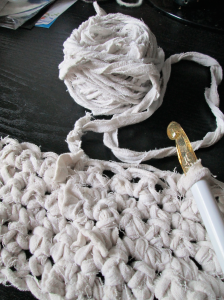
Spin, Spin, Spin away until you reach the end. Wind it into a ball and get crocheting! I cut the seam off of the beginning and end of every ball of yarn and then tied the ends in a tight square knot. The knot blends in with the tabs from the seams and doesn’t require you to weave in ends. You are welcome to use whatever method you prefer to connect the balls, though. This rug took 9 towels worth of strips and measures approximately 2 x 3 feet. I used an Addi 12mm hook but any large hook over 10mm should work. Larger hooks will give you a more open, airy feel. I do not suggest going smaller than 10mm because the stitches become too dense to work.
Ch 26.
1. SC in second chain from hook and every chain across. (25 stitches)
2. Ch 1, turn. SC in every stitch. (25 stitches)
Repeat row 2 until rug is 6 inches shorter than desired width or until you have 2 balls of yarn left. Begin border:
1. SC in each stitch across. CH 1, turn rug 90 degrees and begin working down the side. 1 SC for each row. At corner, CH 1 and turn rug another 90 degrees. 1 SC in each chain stitch. At corner, CH 1 and turn rug another 90 degrees and begin working down the second side. 1 SC for each row. CH 1 at end of row.
2. HDC in back loop only of every SC from previous row. At each corner, work HDC, CH 1, HDC in each chain space from the previous corner. End row after HDC, CH 1, HDC in final CH 1 space from previous row.
3. HDC through both loops of every stitch, working HDC, CH 1, HDC in each chain space from the previous corner. End row after HDC, CH 1, HDC in final CH 1 space from previous row.
Work row 3 a total of 2 times. You should have 3 rows of HDC around the blanket. Finish right before or right after the corner, depending on your yarn and how it looks. Finish with a slip stitch and pull through the yarn to secure your end. Weave in the end.
If you don’t have enough yarn to make it to the corner, just slip stitch the yarn to secure it when you have about 6 inches of yarn remaining and weave in the end.
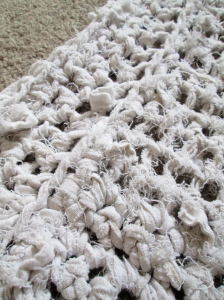
And you’re done! I washed my rug on hot with just a bit of detergent and dried it (and dried it, and dried it) on low to get out the extra lint and to make it extra shaggy. If you don’t like the shaggy look, don’t use flour sack towels! They will shred and get shaggy when you wash. T Shirt fabric or flannel will work exactly the same way without the shaggy effect. Old flannel sheets are fantastic for this!
My daughter has claimed this rug as her own and wants it dyed HOT pink. I will share pictures once we’re through the dyeing process. You can custom dye your own with any dyes that work on cotton. We picked Flamingo Pink in Dylon, but RIT or even tie-dye kits would work just as well!
Part 2 – Dye your rug Now available!


